Here’s a general guide to help you through the process:
Create Quality Content: Ensure your website has original, high-quality content that is useful and relevant to your audience. Aim for at least 20-30 posts or pages before applying.
Comply with AdSense Policies: Familiarize yourself with Google AdSense policies and guidelines. Key areas include:
No adult content, violence, or illegal activities.
No misleading information or clickbait.
Ensure your content is family-friendly.
Design a User-Friendly Website: Make sure your website has a clean and professional design. It should be easy to navigate, with clear menus and categories. Responsive design for mobile users is crucial.
Add Essential Pages: Include important pages such as:
About Us
Contact Us
Privacy Policy
Terms and Conditions
Ensure Your Site is Fully Functional: Check for broken links, slow loading times, and ensure that all features work properly.
Set Up a Custom Domain: If possible, use a custom domain (e.g., www.yoursite.com) instead of a free subdomain.
Check Traffic Sources: Ensure that your traffic comes from legitimate sources. Avoid using paid traffic services that violate AdSense policies.
Apply for AdSense: Once your site is ready, go to the AdSense website and sign up. Fill out the application form and submit your site for review.
Wait for Approval: Google will review your application, which can take anywhere from a few days to a couple of weeks. You’ll receive an email with the result of your application.
Implement Ad Codes: If approved, you’ll receive ad code snippets to place on your website. Make sure to follow the instructions carefully to implement ads correctly.
Monitor Performance: Once ads are live, monitor your performance and compliance with AdSense policies regularly to avoid issues.
If your application is rejected, review the feedback provided, make the necessary changes, and consider reapplying after some time.
Adding an ads.txt file is typically required to get approval to monetize your website with ad networks.
Here’s how you can upload an ads.txt file to your WordPress site:
Method 1: Using an FTP Client
Create Your ads.txt File:
Open a text editor (like Notepad or TextEdit).
Add the required lines to the file, specifying your ad network information.
Save the file as ads.txt.
Connect to Your Website via FTP:
Use an FTP client (like FileZilla or Cyberduck) to connect to your web server.
Enter your FTP credentials (hostname, username, password, and port).
Navigate to the Root Directory:
Once connected, navigate to the root directory of your WordPress installation, usually called public_html or the folder named after your domain.
Upload the ads.txt File:
Drag and drop the ads.txt file from your computer into the root directory.
Verify the Upload:
Open your browser and enter http://yourdomain.com/ads.txt to check if the file is accessible.
Method 2: Using a File Manager in cPanel
Create Your ads.txt File:
Follow the same steps as above to create and save the ads.txt file.
Log into Your cPanel:
Access your hosting account and log into cPanel.
Open File Manager:
Find and click on the File Manager icon.
Navigate to the Root Directory:
Locate the root directory of your WordPress site (usually public_html).
Upload the ads.txt File:
Click on the Upload button in the File Manager.
Select your ads.txt file and upload it.
Verify the Upload:
As before, check by navigating to http://yourdomain.com/ads.txt in your browser.
Method 3: Using a Plugin
If you prefer a more user-friendly method, you can use a plugin:
Install a Plugin:
Go to your WordPress dashboard.
Navigate to Plugins > Add New.
Search for a plugin like Ads.txt Manager or Insert Headers and Footers.
Activate the Plugin:
Once installed, activate the plugin.
Configure the Plugin:
Follow the plugin instructions to upload or enter the content for your ads.txt file.
Save and Verify:
Save the changes and verify the upload by checking http://yourdomain.com/ads.txt.
Final Steps
Regardless of the method you choose, always remember to verify that the ads.txt file is accessible. This is essential for ad networks to recognize and validate your site.
Checking a website’s Core Web Vitals is essential for assessing its performance and user experience. Core Web Vitals focus on three main aspects: loading performance, interactivity, and visual stability.Here are several methods to check your site’s Core Web Vitals:
Access Google Search Console: Log into your Google Search Console account.
Select Your Property: Choose the website you want to analyze.
Navigate to Core Web Vitals: In the left sidebar, click on “Core Web Vitals” under the “Experience” section.
Review Report: You’ll see a report that shows how your site performs based on real user data, categorizing pages as “Good,” “Needs Improvement,” or “Poor.”
3. Lighthouse
Open Chrome DevTools: Right-click on your website and select Inspect or press Ctrl + Shift + I (Windows) or Command + Option + I (Mac).
Navigate to Lighthouse: Click on the Lighthouse tab in the DevTools panel.
Generate Report: Select the options for mobile or desktop and click the “Generate Report” button.
Analyze Results: The report will include Core Web Vitals metrics along with recommendations for improvement.
4. Web Vitals Chrome Extension
Install the Extension: Go to the Chrome Web Store and search for Web Vitals. Install the extension.
Run the Extension: After installation, click the extension icon while visiting your website.
View Metrics: The extension will display real-time metrics for LCP, FID, and CLS directly in your browser.
Select Test Options: Choose a location and browser, then click “Start Test.”
Analyze Results: Once the test completes, you’ll see detailed metrics, including Core Web Vitals.
Final Steps
After analyzing your Core Web Vitals, review the provided recommendations for improvement. Focus on optimizing loading times, enhancing interactivity, and ensuring a stable layout to enhance user experience and improve search rankings.
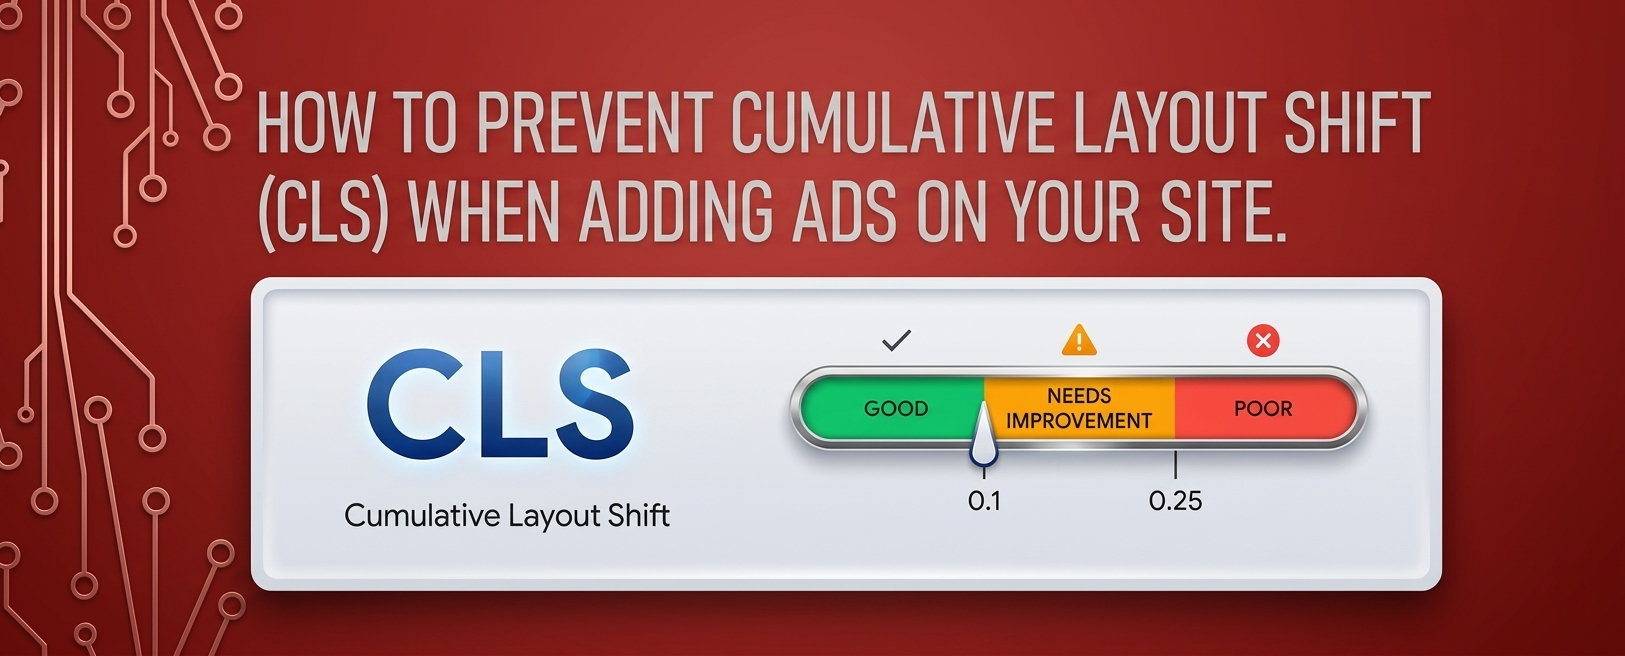
To prevent ads from causing layout shifts on your site, it’s important to implement best practices for ad placement and sizing. Here are some effective strategies:
1. Specify Size for Ad Containers
Always define the width and height of your ad units in pixels or percentages. This ensures the browser reserves space for the ad before it loads.
<div class="ad-container" style="width: 300px; height: 250px;">
    <script>/* Ad code here */</script>
</div>
2. Use Responsive Ads Carefully
If using responsive ad units, ensure the parent container has a defined aspect ratio. This helps maintain layout integrity during loading.
.responsive-ad {
    width: 100%; /* Full width */
    height: auto; /* Maintain aspect ratio */
    padding-bottom: 75%; /* Example aspect ratio for 300x250 */
    position: relative; /* Position relative for absolute child */
}
3. Implement a Placeholder for Ads
Create a placeholder or a “dummy” ad container with fixed dimensions. This helps prevent layout shifts while the ad loads.
Consider lazy loading ads that are off-screen. This can help manage loading times and prevent layout shifts for ads that aren’t immediately visible to the user.
Avoid using pop-up ads that cover the main content and cause shifts when they appear. Instead, consider using static banners that fit within the layout.
8. Test Your Ads Setup
After implementing your ads, use tools like Google PageSpeed Insights or Lighthouse to check your CLS score and see if the ads are causing any layout shifts.
9. Regularly Update Ad Sizes
Stay updated with the latest ad sizes recommended by ad networks and make sure your site accommodates these dimensions properly.
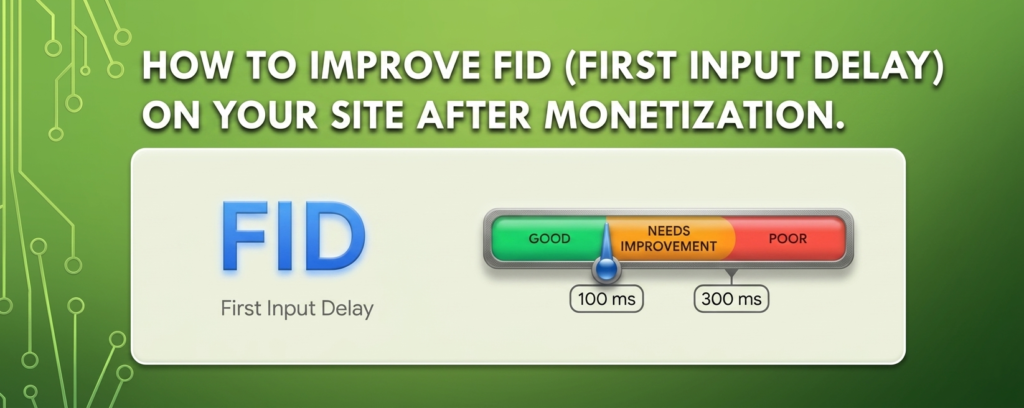
Improving First Input Delay (FID) on your site after monetization is crucial for maintaining a good user experience. FID measures the time it takes for a page to respond to a user’s first interaction (like clicking a link or button). Here are several strategies to enhance FID while ensuring your monetization efforts do not negatively impact performance:
1. Optimize JavaScript Execution
Minimize JavaScript: Reduce the amount of JavaScript that needs to load before the page becomes interactive. Remove any unused code and minimize scripts where possible.
Defer and Async Loading: Use defer or async attributes on your script tags to prevent blocking the main thread. This allows the browser to load JavaScript without delaying the page’s initial rendering.
Load essential scripts for initial interactions first. Non-essential scripts can be loaded later, after the main content has loaded.
3. Optimize Third-Party Scripts
Be mindful of third-party scripts, especially ads and tracking scripts, as they can slow down FID. Use lightweight alternatives or load them asynchronously.
Consider using a tag manager to control when and how third-party scripts are loaded.
4. Reduce Main Thread Work
Limit the complexity of tasks running on the main thread during the page’s initial load. Break up long tasks using techniques like requestIdleCallback to improve responsiveness.
5. Implement Lazy Loading
Use lazy loading for images and iframes to defer loading of off-screen content. This reduces the initial load time and allows users to interact with the page sooner.
Load fonts efficiently by using font-display: swap; in your CSS to ensure text remains visible during font loading. This prevents delays in rendering text and improves FID.
Optimize your server response time to ensure that the HTML is delivered to the browser quickly. This includes optimizing your hosting environment and using caching strategies.
8. Reduce Resource Size
Compress resources (images, CSS, and JavaScript) using tools like Gzip or Brotli. Smaller resource sizes reduce load times and improve responsiveness.
9. Use a Content Delivery Network (CDN)
Implement a CDN to serve your content from locations closer to your users, reducing latency and improving load times.
10. Monitor Performance Regularly
Use tools like Google PageSpeed Insights, Lighthouse, or WebPageTest to regularly monitor your site’s performance, focusing on FID. Adjust strategies based on the data you collect.
Improving Largest Contentful Paint (LCP) on your site after monetization is essential for ensuring a positive user experience. LCP measures how quickly the largest visible content element on your page loads and is fully rendered. A good LCP score is under 2.5 seconds. Here are several strategies to enhance LCP while managing your monetization efforts:
1. Optimize Images and Media
Use Appropriate Formats: Use modern image formats like WebP or AVIF, which offer better compression without compromising quality.
Compress Images: Optimize images to reduce file sizes. Use tools like TinyPNG or ImageOptim to compress images without significant loss in quality.
Specify Dimensions: Always specify the width and height attributes in your image tags or CSS. This helps the browser allocate space for images before they load.
Optimize your server and hosting environment to ensure fast response times. This may involve choosing a better hosting plan or provider, optimizing your database, or using server-side caching.
3. Use a Content Delivery Network (CDN)
Implement a CDN to serve static assets (like images, CSS, and JavaScript) from locations closer to your users. This reduces latency and speeds up content delivery.
4. Minimize Render-Blocking Resources
Defer Non-Critical JavaScript: Use the defer or async attributes for script tags to prevent them from blocking rendering of the main content.
Inline Critical CSS: Inline critical CSS needed for rendering the above-the-fold content and load non-critical CSS asynchronously.
5. Optimize Fonts
Load web fonts efficiently by using the font-display: swap; property in your CSS. This ensures text is visible while fonts are loading, preventing delays in rendering.
Review your site’s plugins and scripts, especially third-party ones like ads and tracking scripts. Remove any that are unnecessary, as they can slow down your site.
7. Lazy Load Off-Screen Content
Implement lazy loading for images and iframes that are off-screen to reduce the initial load time for above-the-fold content.
Minimize and compress CSS files to reduce their size and improve loading times. Combine CSS files where possible to reduce the number of HTTP requests.
9. Reduce the Size of Your HTML
Optimize your HTML structure to reduce its size. Remove unnecessary comments and whitespace, and ensure that only essential elements are loaded initially.
10. Monitor and Test Regularly
Use tools like Google PageSpeed Insights, Lighthouse, or WebPageTest to monitor your LCP score and identify areas for improvement. Make adjustments based on the insights gained from these tools.
How to Use AI for Smarter Ad Placements: A Beginner’s Guide
In the modern digital landscape, running ads without data is essentially “spraying and praying”—and that’s an expensive way to fail.
The good news? You don’t have to be a data scientist to win. AI-powered tools within Google Ads and Meta Ads Manager now do the heavy lifting for you, automating the “where, when, and who” of your campaigns. This guide will show you how to leverage AI to stop wasting your budget and start reaching the right people.
🤖 What Exactly Does AI Do for Your Ads?
Think of AI as a 24/7 marketing assistant that never sleeps. It processes millions of data points in milliseconds—something no human could ever do manually.
AI analyzes:
User Behavior: Who is clicking, scrolling, or watching?
Contextual Data: What device are they on? Where are they located?
Timing: When is a user most likely to make a purchase?
The Shift: Instead of you guessing which website or app your customer visits, the AI identifies the intent and places your ad exactly where that person is at that moment.
🎯 3 Ways to Leverage AI Right Now
1. Smart Audience Targeting
AI doesn’t just look at demographics; it looks at patterns. It finds “Lookalike Audiences”—people who behave exactly like your existing customers but haven’t discovered you yet.
Try this: Use Meta’s Lookalike Audiences or Google’s Predictive Segments.
2. Automated Placement (The “Set It and Forget It” Advantage)
Instead of manually picking “Instagram Stories” or “YouTube Sidebar,” let the machine decide.
The Tool:Meta Advantage+ Placements or Google Performance Max.
The Result: Your ad automatically shifts to whichever sub-platform is currently delivering the cheapest conversions.
3. Real-Time Budget Optimization
AI monitors which ads are winning and moves your money there instantly.
The Tool:Campaign Budget Optimization (CBO).
The Result: You stop spending money on “dud” ads and double down on winners without lifting a finger.
🚀 Your 5-Step AI Starter Strategy
If you’re ready to start, follow this “Low-Stress” workflow:
Choose One Arena: Don’t be everywhere at once. Start with either Meta (Social) or Google (Search/Video).
Trust the Algorithm: When setting up your campaign, select “Automatic Placements.” 3. Go Broad: Avoid hyper-niche targeting. Give the AI a larger pool of people so it has enough data to learn.
The “Power of 3”: Upload at least 3 different images or videos. AI needs options to test which one resonates.
The 7-Day Rule: Do not touch your ads for at least 5–7 days. This is the “Learning Phase” where the AI is calibrating.
⚠️ Mistakes That Kill AI Performance
The Mistake
Why it Hurts
Micro-Managing
Changing settings every 24 hours resets the AI’s “learning” process.
Over-Targeting
Adding too many filters (age + interest + location + behavior) suffocates the AI.
Bad Creative
AI can find the right person, but it can’t make a boring ad interesting.
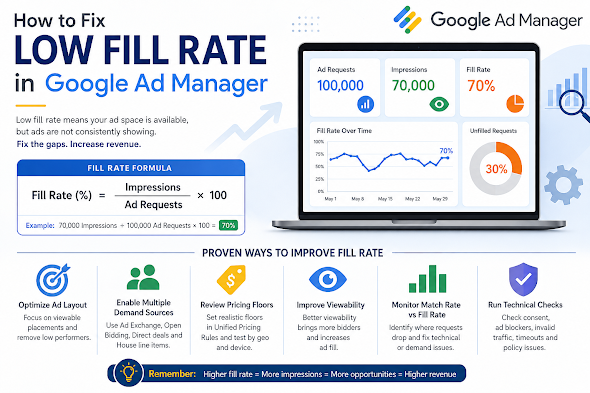
How to Fix Low Fill Rate in Google Ad Manager (GAM)
If your revenue drops despite steady traffic, the first metric to audit is your Fill Rate. A low fill rate indicates that your site is generating ad requests that aren’t converting into impressions. Essentially, you are leaving money on the table.
What Is Fill Rate?
Fill rate is the percentage of ad requests that result in a displayed ad.
Example: If you have 100,000 ad requests but only 70,000 impressions, your fill rate is 70%. While “healthy” rates vary by niche, most publishers aim for 80–95% on standard display inventory.
5 Common Culprits Behind Low Fill Rate
Reason
The Impact
Low Geo Demand
Traffic from Tier 3 countries often lacks the advertiser depth to fill every request.
Ad Unit Overload
Too many ad units on one page dilute bid competition and slow down page rendering.
Restrictive Sizes
Using non-standard sizes (e.g., 200×200) limits the pool of available creative assets.
Aggressive Floors
Setting CPM floors too high rejects bids that would otherwise have filled the slot.
Technical Latency
If the page loads too slowly, the user may scroll past or leave before the ad renders.
Strategic Solutions to Boost Fill
1. Optimize Pricing Rules (UPRs)
Check your Unified Pricing Rules in GAM. If your floors are set based on peak seasonal demand (like Q4), they may be too high for slower periods.
Action: Experiment with “Floor Shifting.” Lower floors for specific low-demand geographies or devices to capture “long-tail” revenue.
2. Diversify Your Demand Stack
Don’t put all your eggs in the AdSense/AdX basket. High-growth publishers use a multi-layered approach:
Header Bidding: Bring in Prebid.js to force AdX to compete with external SSPs.
Open Bidding: Enable Google’s server-to-server demand.
Backfill/House Ads: Ensure you have a “catch-all” line item (like a self-promotion or a low-priority ad network) to ensure 0% of requests go to waste.
3. Focus on “Signal” over “Volume”
Advertisers bid more—and more often—on high-viewability inventory.
Lazy Loading: Only request the ad when the user is about to scroll to it. This reduces “unfilled” requests from the bottom of the page that never get seen.
Ad Refresh: If using auto-refresh, ensure it only triggers when the ad is in view.
4. Standardize Ad Sizes
Enable Multi-Size Pricing. Instead of just requesting a 300×250, allow the slot to accept 300×600 or 320×50. Increasing the number of eligible creatives for a single slot naturally drives up the fill rate.
Technical Troubleshooting Checklist
If your demand looks healthy but fill is still low, check for these “silent killers”:
CMP Issues: If your Consent Management Platform isn’t firing correctly, Google cannot serve personalized ads (or any ads) in regulated regions like the EU (GDPR).
app-ads.txt / ads.txt: Ensure your file is reachable and up to date. Missing entries will lead to immediate bid rejection.
Mismatched Line Items: Check if your line item targeting (Geo, Device, Key-values) is too narrow for the traffic you are receiving.
Rendering Timeouts: If your Header Bidding timeout is too short, the auction might close before bids arrive.
Summary: When Should You Worry?
A temporary dip during the start of a quarter (January, April, July, October) is normal as advertiser budgets reset. However, a sustained drop usually points to a pricing mismatch or a technical bottleneck.
The Goal: Optimization isn’t about adding more ads; it’s about making your existing ad slots more “eligible” for the highest number of buyers possible.
How to Add Ad Units in Google Ad Manager (GAM) for Beginners
If you’re just starting with Google Ad Manager, one of the first things you need to understand is Ad Units.
Ad Units are the spaces on your website where ads appear. Think of them as “containers” that tell Google Ad Manager exactly where an advertisement should be displayed — like the header, sidebar, in-article section, or footer.
Without properly created Ad Units, GAM cannot serve ads correctly.
This beginner-friendly guide walks you through the entire process step by step.
What Are Ad Units in Google Ad Manager?
An Ad Unit is a defined ad placement inside your website or app.
Examples include:
Homepage banner
Sidebar rectangle
Sticky footer ad
In-article ad
Mobile anchor ad
Each Ad Unit has:
A unique name
A unique code
Supported ad sizes
Targeting settings
These are later connected to:
Line items
Orders
AdSense or Ad Exchange demand
Header bidding partners
Why Proper Ad Unit Setup Matters
A clean Ad Unit structure helps with:
Better reporting
Easier troubleshooting
Improved targeting
Higher CPM optimization
Cleaner header bidding integration
Better inventory organization
Poorly organized ad units can create confusion later when your site scales.
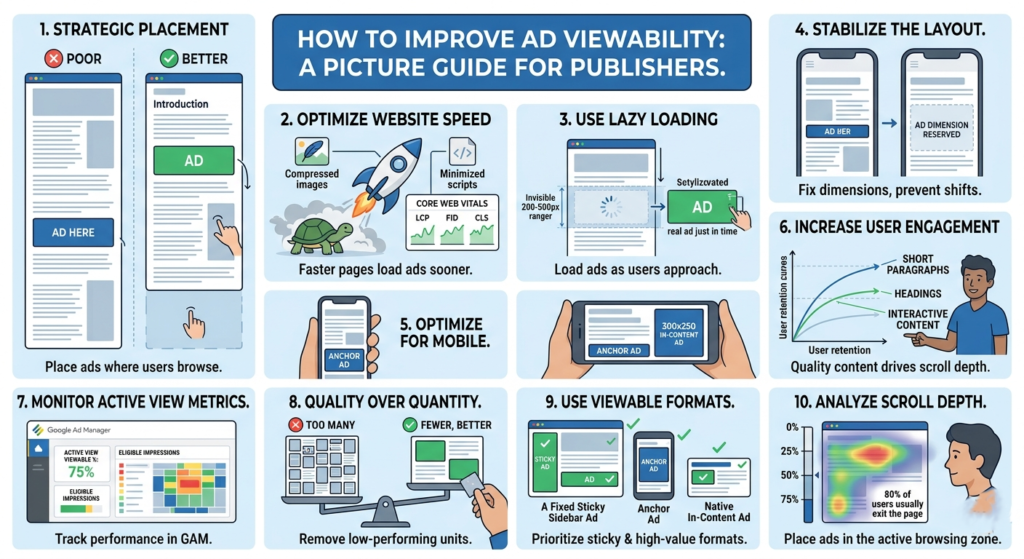
In digital advertising, traffic alone is no longer enough. One of the biggest factors that directly impacts ad revenue today is ad viewability — a metric that measures whether users actually see the ads displayed on your website.
A page can generate thousands of impressions, but if users never scroll far enough to see the ads, advertisers may pay less or stop bidding aggressively altogether.
For publishers using platforms like Google Ad Manager or programmatic demand sources, improving viewability can significantly increase CPMs, advertiser trust, and long-term revenue performance.