Tag: FID Improvement

  • Checking Site’s Core Web Vitals

    Checking Site’s Core Web Vitals

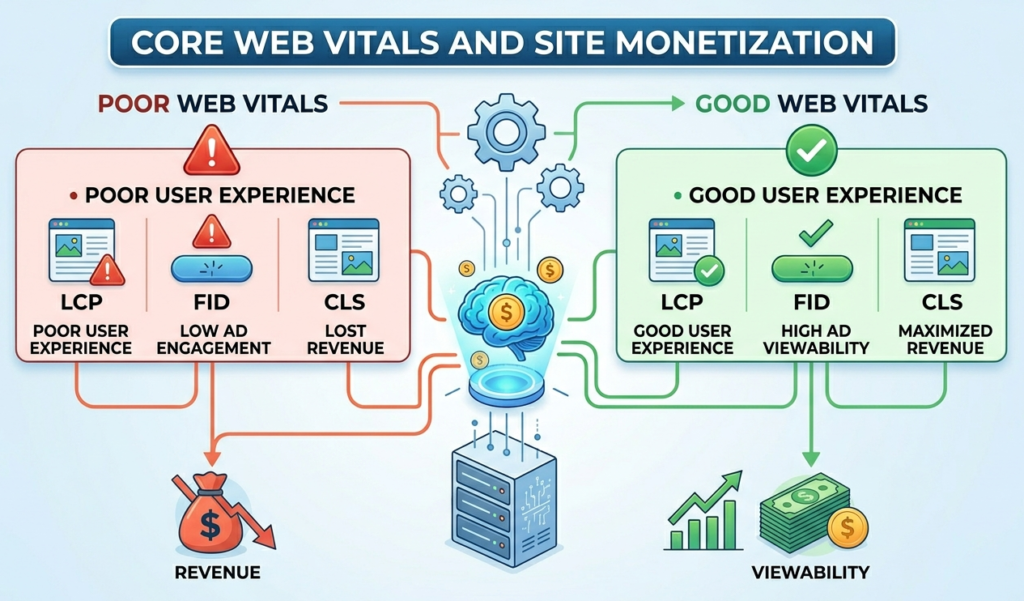
    Checking a website’s Core Web Vitals is essential for assessing its performance and user experience. Core Web Vitals focus on three main aspects: loading performance, interactivity, and visual stability.Here are several methods to check your site’s Core Web Vitals:

    1. Google PageSpeed Insights

    • Access the Tool: Go to PageSpeed Insights.
    • Enter URL: Type in the URL of the website you want to analyze.
    • Run Analysis: Click the “Analyze” button.
    • Review Results: The tool will provide a score for mobile and desktop performance, along with specific metrics for:
      • Largest Contentful Paint (LCP): Measures loading performance.
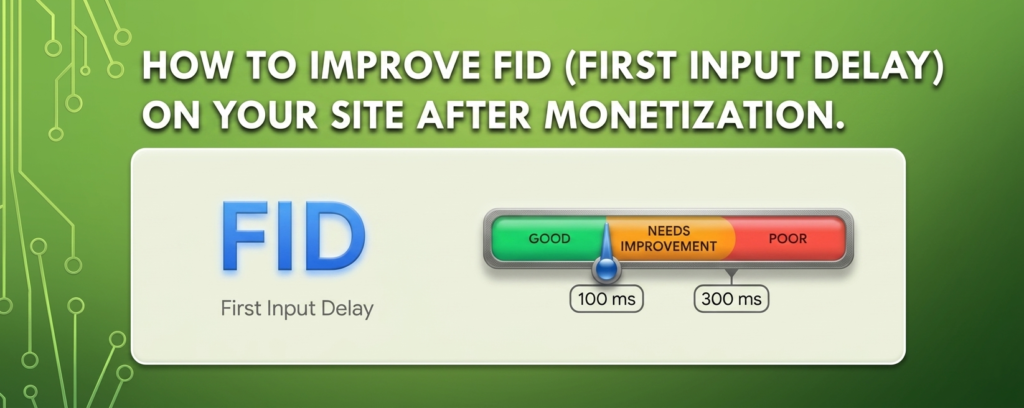
      • First Input Delay (FID): Measures interactivity.
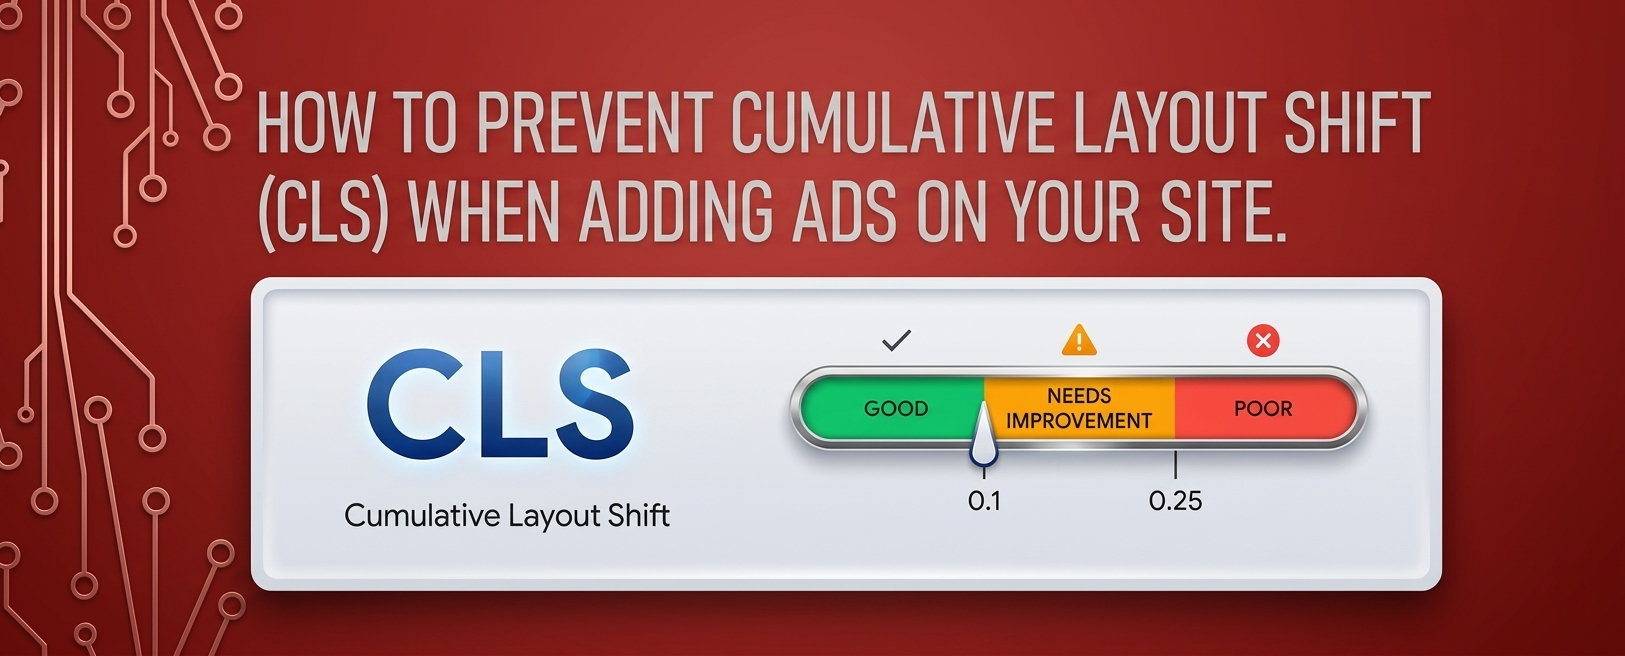
      • Cumulative Layout Shift (CLS): Measures visual stability.

    2. Google Search Console

    • Access Google Search Console: Log into your Google Search Console account.
    • Select Your Property: Choose the website you want to analyze.
    • Navigate to Core Web Vitals: In the left sidebar, click on “Core Web Vitals” under the “Experience” section.
    • Review Report: You’ll see a report that shows how your site performs based on real user data, categorizing pages as “Good,” “Needs Improvement,” or “Poor.”

    3. Lighthouse

    • Open Chrome DevTools: Right-click on your website and select Inspect or press Ctrl + Shift + I (Windows) or Command + Option + I (Mac).
    • Navigate to Lighthouse: Click on the Lighthouse tab in the DevTools panel.
    • Generate Report: Select the options for mobile or desktop and click the “Generate Report” button.
    • Analyze Results: The report will include Core Web Vitals metrics along with recommendations for improvement.

    4. Web Vitals Chrome Extension

    • Install the Extension: Go to the Chrome Web Store and search for Web Vitals. Install the extension.
    • Run the Extension: After installation, click the extension icon while visiting your website.
    • View Metrics: The extension will display real-time metrics for LCP, FID, and CLS directly in your browser.

    5. GTmetrix

    • Access GTmetrix: Go to GTmetrix.
    • Enter URL: Type in the website URL you want to check.
    • Run the Analysis: Click the “Test your site” button.
    • Review Results: The report will provide a performance score along with recommendations, including Core Web Vitals metrics.

    6. WebPageTest

    • Access WebPageTest: Go to WebPageTest.
    • Enter URL: Input the URL of your website.
    • Select Test Options: Choose a location and browser, then click “Start Test.”
    • Analyze Results: Once the test completes, you’ll see detailed metrics, including Core Web Vitals.

    Final Steps

    After analyzing your Core Web Vitals, review the provided recommendations for improvement. Focus on optimizing loading times, enhancing interactivity, and ensuring a stable layout to enhance user experience and improve search rankings.

  • What is Google Core Web Vitals ?

    What is Google Core Web Vitals ?

    Google Core Web Vitals are a set of specific factors that Google considers important for delivering a good user experience on the web. These metrics focus on three key aspects of page performance:

    Basic Core Web Vitals Metrics:

    Goal: A CLS score of 0.1 or less is considered good.

    Largest Contentful Paint (LCP):

    Definition: Measures loading performance. It marks the point in the page load timeline when the largest text block or image is rendered on the screen.

    Goal: An LCP of 2.5 seconds or faster is considered good.

    First Input Delay (FID):

    Definition: Measures interactivity. It quantifies the time it takes for a user to interact with a page (e.g., clicking a link or button) until the browser responds.

    Goal: An FID of 100 milliseconds or less is considered good.

    Cumulative Layout Shift (CLS):

    Definition: Measures visual stability. It assesses how much the page layout shifts during the loading process, which can lead to poor user experience.

  • How Core Web Vitals Affect Site Monetization?

    How Core Web Vitals Affect Site Monetization?

    To enhance your website’s monetization potential, it’s essential to monitor and optimize your Core Web Vitals. By ensuring your site loads quickly, responds to user interactions promptly, and maintains visual stability, you can improve user experience, increase traffic, and ultimately boost your revenue from ads.

    Sites that prioritize and optimize for Core Web Vitals may gain a competitive advantage over others in the same niche. A better user experience can lead to increased user loyalty, return visits, and improved conversion rates.

    Impact on SEO Rankings:

    Google uses Core Web Vitals as a ranking factor in its search algorithm. Websites that provide a better user experience through improved Core Web Vitals are more likely to rank higher in search results. Higher visibility can lead to increased traffic and potentially higher ad revenue.

    User Experience:

    Poor Core Web Vitals can lead to a frustrating user experience, causing visitors to leave the site quickly (higher bounce rates). This can negatively impact ad impressions and engagement, which in turn can lower monetization potential.

    Ad Revenue:

    Ad networks, including Google AdSense, may prioritize or recommend websites with good performance metrics. Sites with poor Core Web Vitals may face lower CPM (cost per thousand impressions) rates due to decreased user engagement and higher bounce rates.

    Compliance with Standards:

    Many advertising partners and networks now consider Core Web Vitals when approving websites for monetization. Websites that do not meet the minimum performance thresholds may struggle to get approved or may face restrictions in their ad serving capabilities.

    Competitive Advantage:

    Sites that prioritize and optimize for Core Web Vitals may gain a competitive advantage over others in the same niche. A better user experience can lead to increased user loyalty, return visits, and improved conversion rate

  • How to prevent Cumulative Layout Shift (CLS) when adding Ads on your site.

    How to prevent Cumulative Layout Shift (CLS) when adding Ads on your site.

    To prevent ads from causing layout shifts on your site, it’s important to implement best practices for ad placement and sizing. Here are some effective strategies:

    1. Specify Size for Ad Containers

    • Always define the width and height of your ad units in pixels or percentages. This ensures the browser reserves space for the ad before it loads.
    <div class="ad-container" style="width: 300px; height: 250px;">
    <script>/* Ad code here */</script>
    </div>

    2. Use Responsive Ads Carefully

    • If using responsive ad units, ensure the parent container has a defined aspect ratio. This helps maintain layout integrity during loading.
    .responsive-ad {
    width: 100%; /* Full width */
    height: auto; /* Maintain aspect ratio */
    padding-bottom: 75%; /* Example aspect ratio for 300x250 */
    position: relative; /* Position relative for absolute child */
    }

    3. Implement a Placeholder for Ads

    • Create a placeholder or a “dummy” ad container with fixed dimensions. This helps prevent layout shifts while the ad loads.
    code<div class="ad-placeholder" style="width: 300px; height: 250px;">
    <!-- Placeholder content -->
    </div>

    4. Reserve Space for Ads in CSS

    • Use CSS to ensure there’s a reserved space for the ad. This can be particularly useful for dynamic ads where the size might vary.
    code.ad-space {
    width: 300px; /* Fixed width */
    height: 250px; /* Fixed height */
    overflow: hidden; /* Hide overflow */
    }

    5. Load Ads Asynchronously

    • Load ads asynchronously to prevent them from blocking the rendering of other content. This can improve the overall loading experience.
    <script async src="https://your-ad-script.js"></script>

    6. Use Lazy Loading for Ads

    • Consider lazy loading ads that are off-screen. This can help manage loading times and prevent layout shifts for ads that aren’t immediately visible to the user.
    code<div class="lazy-ad" data-src="your-ad-code">
    <!-- Lazy loading logic -->
    </div>

    7. Minimize the Use of Pop-Up Ads

    • Avoid using pop-up ads that cover the main content and cause shifts when they appear. Instead, consider using static banners that fit within the layout.

    8. Test Your Ads Setup

    • After implementing your ads, use tools like Google PageSpeed Insights or Lighthouse to check your CLS score and see if the ads are causing any layout shifts.

    9. Regularly Update Ad Sizes

    • Stay updated with the latest ad sizes recommended by ad networks and make sure your site accommodates these dimensions properly.

    Conclusion

  • How to improve FID on your site after monetization.

    How to improve FID on your site after monetization.

    Improving First Input Delay (FID) on your site after monetization is crucial for maintaining a good user experience. FID measures the time it takes for a page to respond to a user’s first interaction (like clicking a link or button). Here are several strategies to enhance FID while ensuring your monetization efforts do not negatively impact performance:

    1. Optimize JavaScript Execution

    • Minimize JavaScript: Reduce the amount of JavaScript that needs to load before the page becomes interactive. Remove any unused code and minimize scripts where possible.
    • Defer and Async Loading: Use defer or async attributes on your script tags to prevent blocking the main thread. This allows the browser to load JavaScript without delaying the page’s initial rendering.
    htmlCopy code<script src="your-script.js" defer></script>
    

    2. Prioritize Critical Scripts

    • Load essential scripts for initial interactions first. Non-essential scripts can be loaded later, after the main content has loaded.

    3. Optimize Third-Party Scripts

    • Be mindful of third-party scripts, especially ads and tracking scripts, as they can slow down FID. Use lightweight alternatives or load them asynchronously.
    • Consider using a tag manager to control when and how third-party scripts are loaded.

    4. Reduce Main Thread Work

    • Limit the complexity of tasks running on the main thread during the page’s initial load. Break up long tasks using techniques like requestIdleCallback to improve responsiveness.

    5. Implement Lazy Loading

    • Use lazy loading for images and iframes to defer loading of off-screen content. This reduces the initial load time and allows users to interact with the page sooner.
    htmlCopy code<img src="example.jpg" loading="lazy" alt="Example">
    

    6. Optimize Your Web Fonts

    • Load fonts efficiently by using font-display: swap; in your CSS to ensure text remains visible during font loading. This prevents delays in rendering text and improves FID.
    cssCopy code@font-face {
        font-family: 'MyFont';
        src: url('myfont.woff2') format('woff2');
        font-display: swap;
    }
    

    7. Improve Server Response Times

    • Optimize your server response time to ensure that the HTML is delivered to the browser quickly. This includes optimizing your hosting environment and using caching strategies.

    8. Reduce Resource Size

    • Compress resources (images, CSS, and JavaScript) using tools like Gzip or Brotli. Smaller resource sizes reduce load times and improve responsiveness.

    9. Use a Content Delivery Network (CDN)

    • Implement a CDN to serve your content from locations closer to your users, reducing latency and improving load times.

    10. Monitor Performance Regularly

    Use tools like Google PageSpeed Insights, Lighthouse, or WebPageTest to regularly monitor your site’s performance, focusing on FID. Adjust strategies based on the data you collect.